Create Fields
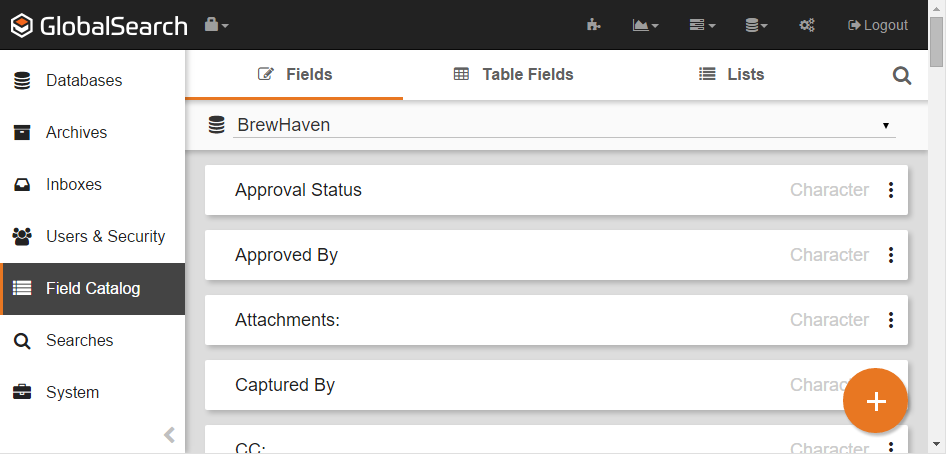
- On the Field Catalog toolbar, click Fields. A list of Fields in the database will appear.
- Click the Add () button to create a new Field.
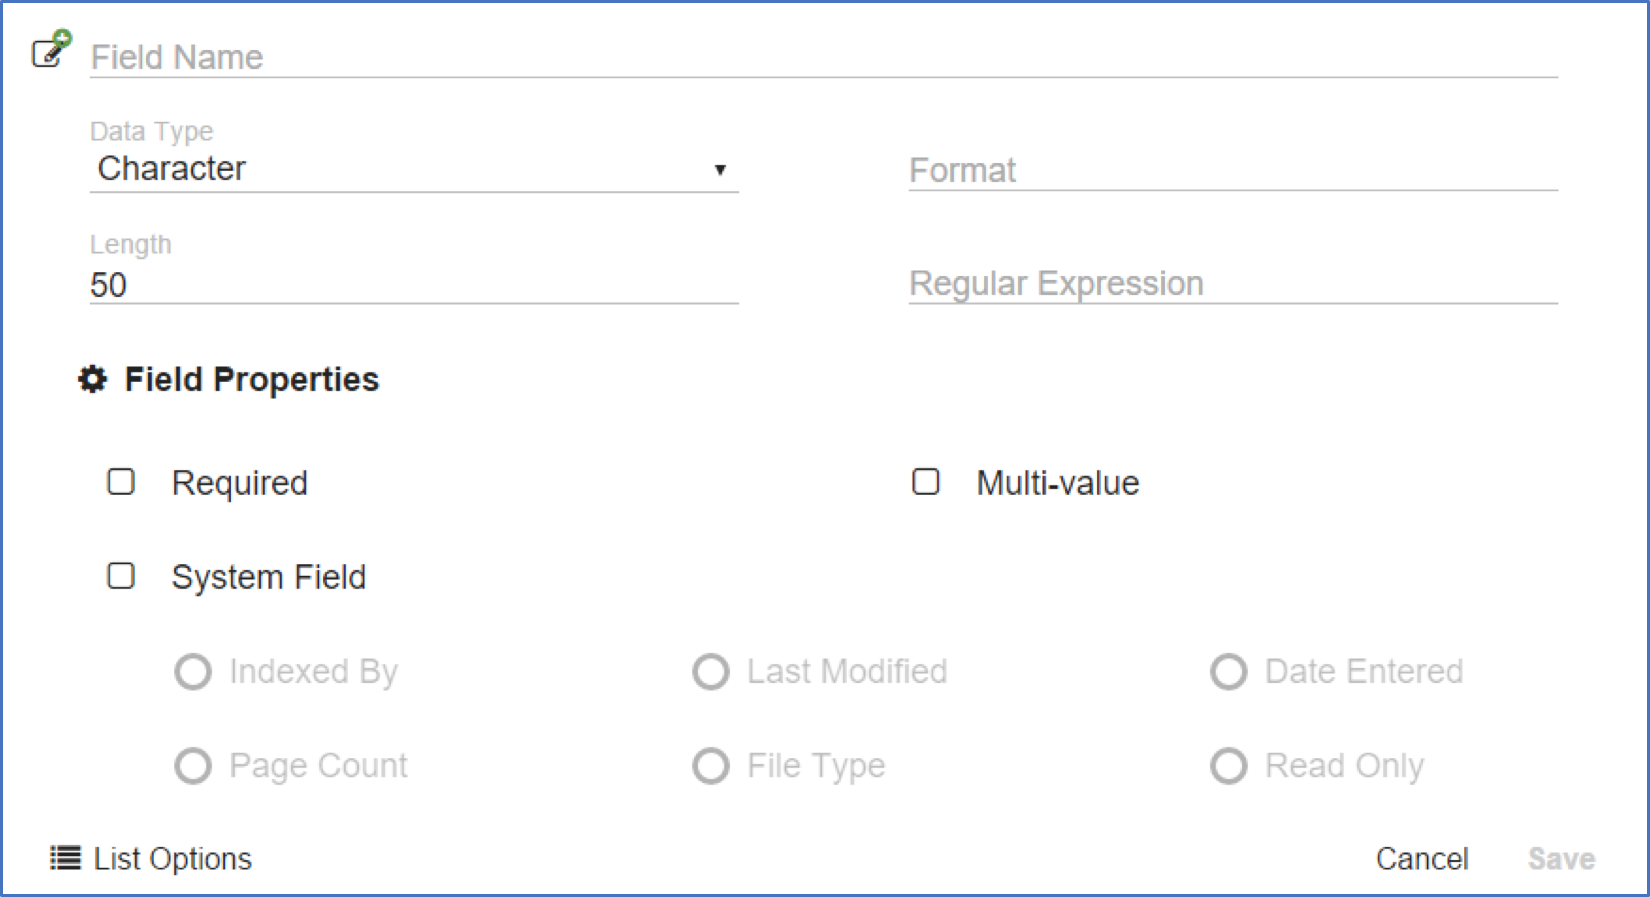
- Enter a name for the new Field in the Field Name text box.
- Select a data type from the Data Type drop-down list. (Refer to the Field Data Types page for details.)
- To display the Field with a certain format or layout (for example, a date with a two-digit year), enter the format type in the Format text box. Refer to Values for Formatting Index Fields for a list of format patterns.
- Enter the maximum number of characters in a Character Field, up to 8000 characters, into the Length text box.
To set a regular expression (RegEx), enter the RegEx text string into the Regular Expression text box. The regular expression pattern is used to highlight text of interest when using KeyFree Indexing.
Use Regular Expressions with KeyFree
A regular expression, or RegEx, is a text string using special symbols that is used as a search pattern for a particular data element. (For example, you may use a RegEx to find any data that looks like a social security number.) Regular expressions are used to enable auto-highlighting during KeyFree Indexing. This feature further improves indexing speeds by bringing the user's attention to the most likely areas where data for a Field may be found.
When a RegEx is provided for a Field that is being populated through KeyFree Indexing, GlobalSearch will attempt to find any data in the document that matches the RegEx. Any matches that are found will be highlighted and the mouse cursor will jump to the first found pattern. You can use double pipes ( || ) to join alternate Regex patterns as well.
For example, the following RegEx is used to locate a zip code as 1) a five-digit string, 2) a five-digit string followed by a hyphen and a four-digit string, 3) a five-digit string followed by a four-digit string:
^\d{5}(?:[-\s]\d{4})?$\d{5}= Match 5 digits (for all three sample patterns)[-\s]= Match a hyphen (for sample 2) or a space (for sample 3)\d{4}= Match 4 digits (for samples 2, 3)
- To set Field Properties or system values, in the Field Properties group, enable one or more of the Required, Multi-value, or System Field checkboxes. Refer to the Field Properties page for details
Before creating a Dynamic Pick List, create any Standard Pick Lists needed for the Dynamic Pick List. Refer to the “Create, Edit, and Delete Field Lists in the Web Client” section above for details on Field Lists. There are two levels of dependency that you can specify for a Dynamic Pick List. The primary level is required and contains a list of standard Fields List values. The secondary level is optional and may have conditional Fields besides regular Field List values. Refer to the List Options page for more information on Dynamic Pick Lists.Plan Fields & Values First
Creating Dynamic Pick Lists goes a lot faster when you plan the Fields, Lists, and values ahead of time. First, you can check to see if you have noted all of the possible variables. Second, you can plan your naming conventions.
The names of the Field Lists are only visible to you as an administrator. Names that are descriptive and which allow for future Lists work best. For example, instead of naming a Field List “Size” and then discovering that you need several different Lists for different size selections, consider using “Paper Size” and “Hard Drive Size.”
- To assign, or create and assign, a Standard Pick List to an Index Field:
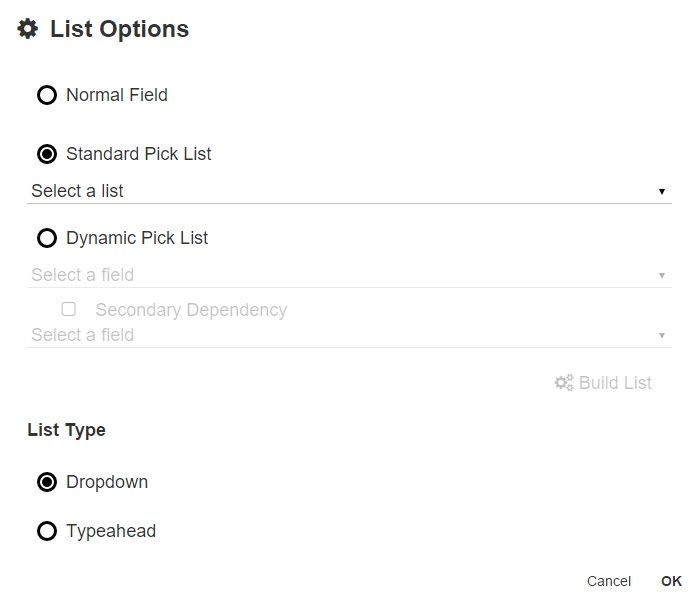
- Click List Options.
- In the List Options dialog box, add a List by changing the default of Normal Field to Dynamic Pick List.
- Select a Field with a Standard Pick List from the Select a list drop-down list.
- For a single level of dependency, skip step d and proceed to building your List.
- To select controlling Fields for an optional second-level Dynamic Pick List, enable Secondary Dependency and select a second Field with a Standard Pick List from the Select a field list.
- To map the relationship between the List and the Field, click Build List.
- In the Edit List Mapping dialog box, in the Select filter 1 drop-down list, select a value for the first row.
- If creating a two-level Dynamic Pick List, from the Select filter 2 drop-down list, select a value from the List associated with the dependent Field.
- This column will not appear in the Edit List Mapping dialog box for a single-level Dynamic Pick List.
- Select a Field List in the Select alist column for each row.
- Repeat steps f through h for each keyword associated with the dependent Field. Map all possible combination that you wish to offer so that the Dynamic List Field can be displayed correctly.
- You will see an error message in the Document Viewer for an unmapped combination.
- Click Save to return to the List Options dialog box.
- In the List Type group, select Drop Down. Refer to the Types of Lists page for details.
- Click OK and return to the Edit dialog box
- Click Save.


