Validate Node
- Former user (Deleted)
- Brian Banet

There are many cases where you might want to force a user to visually validate data, documents, or both in a workflow process. You may want users to visually validate pages for scan quality before OCR, you may want users to visually validate extracted data, or you may want to set up a double-blind data entry process. No matter the reason, use one or more Validate Nodes in a Workflow whenever you need to confirm or modify a document or its data as part of the capture process.
Validate Nodes are used for:
- Task-based Security on the Workflow – Users may see the documents they need, when they need it, but only for the work assigned to them.
- Validation Actions – One or more custom actions can be taken in a validation step, which could require user input or be system driven. Using multi-action Validate Nodes and multiple Validate Nodes in a Workflow GlobalCapture covers even the most complex capture scenarios.
How Fields are Viewed – Maximize efficiency and meet compliance goals by displaying only the Fields needed and in the order needed for each step in the validation process.
- Drag the Validate Node from the Nodes Pane to the Design Canvas.
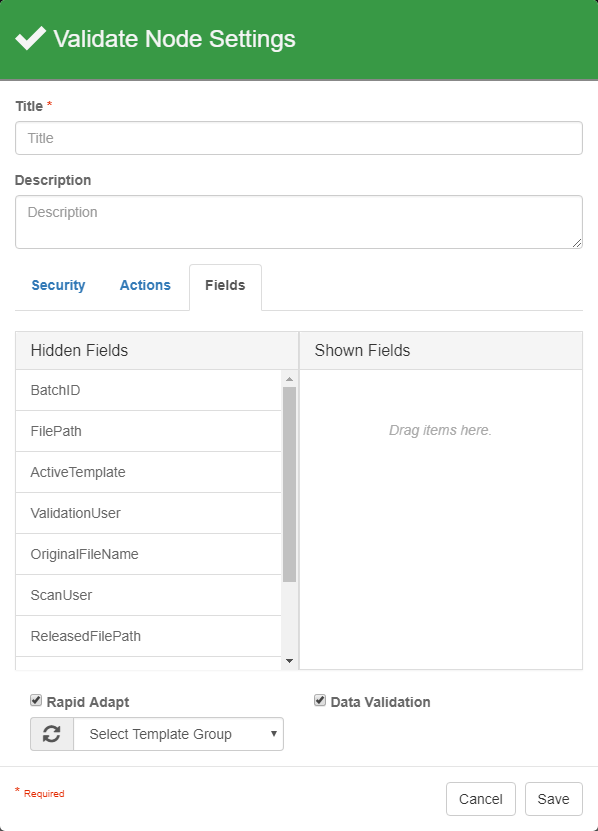
- In the Validate Node Settings dialog that appears, enter a unique name and a description for the Node.
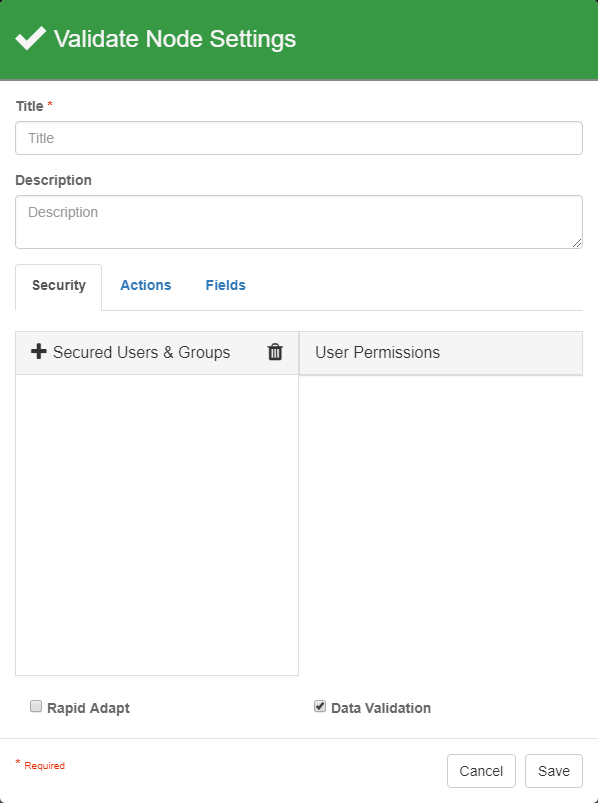
Optionally, enable RapidAdapt to allow any user with permissions to the Workflow the ability to create a RapidAdapt Template from the Validation Station.
With RapidAdapt enabled, you can assign a Template Group for the RapidAdapt Templates that users might create at the validate step. When using RapidAdapt, always specify a Template Group to ensure the user generated Templates in a process don't mix in with Templates from other processes. It will be much easier to manage your Forms Learning platform in this way. Note thats version prior to 2.1 do not support Template Group assignment for RapidAdapt forms. Customers using RapidAdapt are strongly encouraged to upgrade to take specific advantage of these features.
Create one or more Template Groups in the Template Designer.
Ensure that the Apply Only Selected OCR Templates setting in the the Classify Node that proceeds the RapidAdapt-enabled Validate Node is disabled.
Select from the list of available Template Groups that appears when RapidAdapt is enabled.
From a user perspective, the Validation Station in GlobalCapture always requires valid data to be entered. When using GlobalForms, there is the potential for data to be provided by the system, via the Resubmission system action. The Data Validation checkbox is enabled by default to enforce Data Type or Length settings for Fields. This setting only applies to GlobalForms. When it is unchecked, data provided by GlobalForms is allowed to be invalid for it's fields. It is always recommended you be sure the data provided conforms to the rules of any target fields to prevent errors downstream in the process. For more information, see the Data Validation page.
- Configure Security, Actions, and Fields settings (see below for details).
- Click Save.
Set Security
Use the Security tab to define the Read, Write, and Modify permissions granted to GlobalCapture users or groups for each of your Validation Actions.
You can set GlobalCapture Workflow permissions from two places: the Manage Portals interface and individual Validate Nodes. Use the Portals permissions to allow administrative-level permissions for each Portal, including access to Workflows within the Portal. Use the much more granular Validate Node security settings for user permissions for just that one step in the Workflow process. For each validation step, you can assign a combination of Read, Write, and Modify permissions for users.
Some notes about permissions:
- Those with Portal administrative permissions do not need to be expressly secured to a Validate Node to be granted permissions to it.
- Users do not need to be granted Batch Portal permissions to be granted access to documents that need validation. This Batch Portal access, however, is restricted to the batches for which they have been specifically granted Validate Node security. From the Batch Manager they can view and validate documents, including opening them in the Validation Station for closer inspection. However, only Portal administrators are allowed to delete or remove documents from the process.
- When you modify user security in the Validate Nodes Settings it is applied to new processes entering the Node, not on-going processes. Any time you modify a Workflow, including when modifing a Validate Node setting, it is a good idea to first unpublish it to halt any new documents from entering, next check Batch Manager to confirm that any remaining documents have been processed through, and then implement your changes.
- Select the Security tab and click the Secured Users & Groups Add (+) button.
The icon to the left indicates a user ( ), group (
 ), Square 9 User (
 ), or a User Notation (
 ).
). - You can select one or more from the Secured Users & Groups list and click the Delete (
 ) icon to delete them from the list.
 - In the User Security Settings dialog that appears, select the type of user or group:
- Standard User – Click Standard User and select one or more users from the Available Users & Groups list, and then click Add.
Use the scroolbar and the filter search box to find specific users or groups.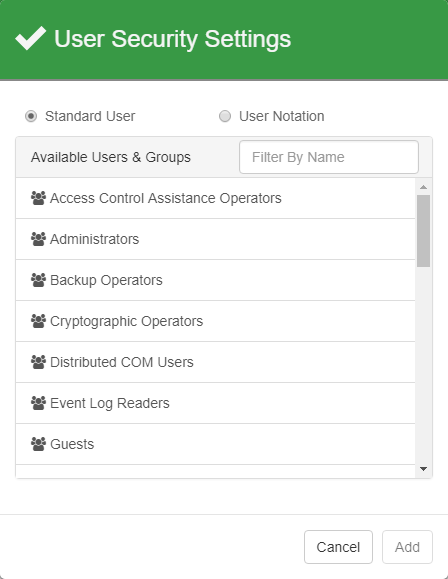
- User Notation – Click User Notation. Enter an S9 Notation or type in a single brace ( { ), and choose from the list of available Notations. Click Add.
At run time the S9 Notation property can be evaluated to apply specific permissions on an individual process basis. When a Workflow process enters the Validate Node, the S9 Notation value is translated. If values change while the process is still in the Validate Node, however, it will not affect the security already set by the S9 Notation. S9 Notations support users, Square 9 Users and groups of users, in that order. This means that it is possible for a group and a user to both be secured with one User Notations setting, if they have the same name.
Please note that multiple users found within a MV Field or Table Field column are not supported for User Notation.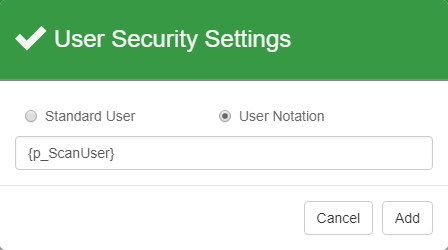
- Standard User – Click Standard User and select one or more users from the Available Users & Groups list, and then click Add.
- Once users or groups have been assigned to the Secured Users & Groups list, choose the document permissions for the Batch Manager and Validation Station.
If you select more than one user or group and they have conflicting permissions, it is indicated by a dash. Resolve the conflicted settings and then save the configuration.- Read – On by default, select Read to allow users to see documents in the Batch Manager and, from there, launch them to the Validation Station. Field values can be viewed but not modified. The user is also allowed to view form data in GlobalForms, if it is installed. Note that data and documents configured as Hidden Fields will also be available to the user. Read permission is required for Write and Modify permissions.
- Write – Leave Read enabled and select Write to allow users to enter or edit Field values in the Validation Station. This includes entering information manually, KeyFree Indexing, Validation Actions, and saving the document without taking any actions. The user is also allowed to enter and edit form data in GlobalForms, if it is installed.
- Modify – Leave Read enabled and select Modify to grant users permission to perform document-level operations in the Validation Station. This includes: inserting, reordering, and deleting pages; bursting; deleting the document; and performing image clean up. This setting does not affect GlobalForms permissions.
Remember that these permissions do not restrict users who have been granted administrator-level batch security.
- Read – On by default, select Read to allow users to see documents in the Batch Manager and, from there, launch them to the Validation Station. Field values can be viewed but not modified. The user is also allowed to view form data in GlobalForms, if it is installed. Note that data and documents configured as Hidden Fields will also be available to the user. Read permission is required for Write and Modify permissions.
- Click Add.
GlobalForms Permissions
Set Validation Actions
You can set multiple different types of Validation Actions for the Node on the Actions tab. The Actions taken will affect which step the document proceeds to in the process. User Actions require manual responses in the Validation Station. System Actions are triggered by timers, OCR results, or resubmitted web forms. You can also create Actions that are a combination of both User and System Actions, where a user triggers a System Action manually.
- To create Actions for the Node, either select the Actions tab in the Validate Node Settings dialog and click the Add ( + ) button or drag a Connection from the Node to the next Node in the Workflow.
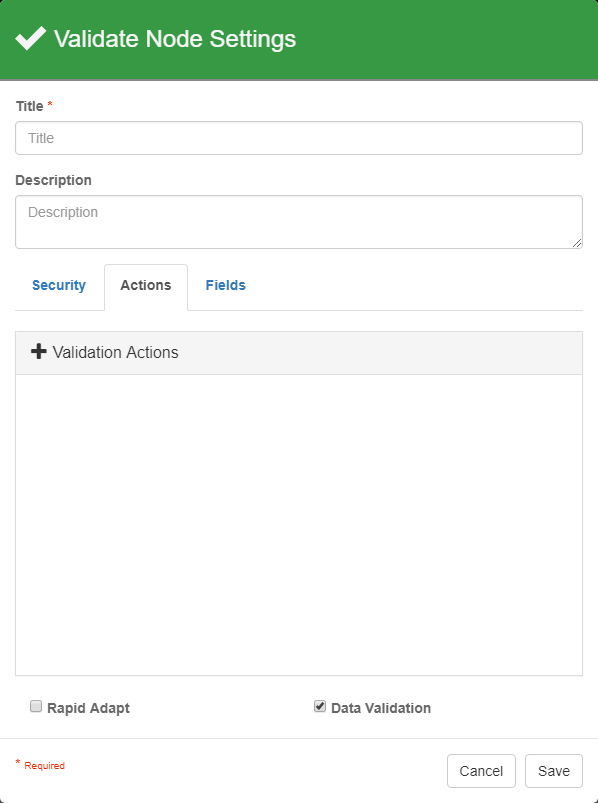
- In the Actions Settings dialog that appears, enter a title for the Action.
This is the label that end users will see when selecting which Action they will take with the document and when looking at the Process History in the Batch Manager. It is a good idea to make it descriptive and specific.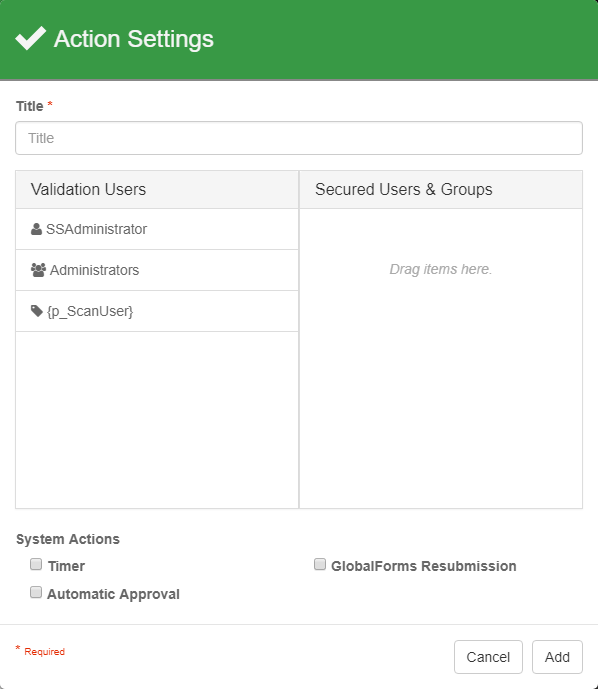
- Select one or more of the users or groups that have been secured to the Node from the Validation Users list and drag them to the Secured Users & Groups list.
This step is required for User Actions but might not be necessary If you’re creating a System Action. - You can select one or more actions from the Validate Actions list and click the edit (
 ) or Delete () icon to change your settings.
Be aware that deleting an Action that is already assigned to a Connection in the Workflow will also delete that Connection. Deleting the Connection, however, merely leave the Action available to be reassigned. - Either click Add to save the settings and close the dialog, or if creating a System Action, continue to the next section.
Set a System Action
A System Action is an event that is triggered by either an elapsed amount of time, a form being resubmitted, or data and confidence level validation that is handled automatically by the OCR Engine. The Timer, Automatic Approval, and GlobalForms Resubmission System Actions types can be used only once per Node. You can, however, add them to the Node one Action at a time or combined them in an Action, or choose to not use a System Action type in the Node at all.
Set a Timer
Use the Timer setting to trigger an event after a specific amount of time has elapsed, such as a time-based escalations or to periodically send email reminders that a document is awaiting user action. The document will enter the validation step and, if there is no other Action, will proceed to the next step in the Workflow once the set time has elasped.
- To specify the Frequency, enter a number in the Days, Hours, and/or Minutes text boxes or use the Up/Down arrows to set the time.
- Click Add.
Set Automatic Approval
Use Automatic Approval to move the document further along the process, if the data passes the set validation parameters. When it is enabled, contextual settings will appear below the checkbox. Optionally you can enable one or both of the additional settings that appear, to further control the approval process. These two settings can be used in conjuction, so that if either of them are not satisfied, the process will not continue without user intervention.
- Enable Automatic Approval to continue to the next step in the process, provided conditions are met.
- Enable OCR Confidence Validation to automatically approve the document, if the data meets or exceeds the threshold for OCR occuracy. (It is enabled by default.) Use the OCR Confidence slider to set the percentage precentage of OCR accuracy. (The default confidence threshold setting is 75 percent.) To increase the threshold, move the slider to the right. To decrease, move the slider to the left. When you select the slider, a percentage indicator will appear.
- Enable Data Validation to confirm that data entered in the Process Fields is of the correct Data Type or Length.
- Click Add.
Set GlobalForms Resubmission
Configure How Fields Display
Use the Fields tab to set which Process Fields will be visible and what the order they will appear to users while validating at this step in the process. Use the Hidden Fields feature to keep System Fields that a user might not need to view (such as ReleasedFilePath) or should not view (such as Social Security Number) from appearing in the Batch Manager or Validation Station. Just keep in mind that users cannot correct data in Fields that they cannot see. If there are Data Type or Field Length mismatches in Hidden Fields, they will remain stuck in a validation step or error at release.
Note that the Fields are not hidden for users with administrator-level Batch security.
- Select the Fields tab.
- Double-click on a Field or select one or more of Fields from the Hidden Fields list of Fields available to the Workflow and drag them to the Shown Fields list.
- Drag Fields in the Shown Fields list to order how they will appear in the Validation Station.
- Click Add.
Select Actions
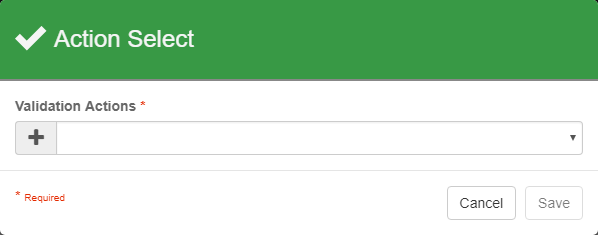
- To validate a document, drag a Connection from the Validate Node to the next Node in the Workflow and, in the Action Select dialog, select one of the Actions that you have configured from the drop-down list. You can connect the Validate Node to one or more other Nodes. Also, keep in mind that once an action has been assigned it can no longer be used until the existing link is deleted and, conversly, it is possible to create an Action that remains unassigned and therefore unused.
Add Validation Points to Catch Issues Early
When confidence in the document capture is high, a Workflow can validate documents automatically. However, there can be times in the process when it is a good idea to allow for manual validation. Once documents are validated with a high confidence level, they can proceed smoothly through the rest of the Workflow.
- Validate Early in the Process – Add a Validate Node immediately after the Import Node so that end users may visually inspect and validate documents entering the system, before they continue in the process. Pages which are flipped over, stained, or folded may need to be rescanned before the OCR process is completely successful.
- Validate Separation – If a multi-page document has no standard Zones, barcodes, or blank pages (or low blank-page confidence) to separate automatically, use the Validate Node to allow users to manually divide the scan into individual documents from the Validation Station.
- Validate Status – Assign users to monitor the Batch Manager and manually validate whether documents are approved for processing. Use the Email Node to send notifications when further attention is needed.