...
- Run a Search and select one or more documents in the Search Results or open a document in the Document Viewer.
- In the Actions menu, select Export.

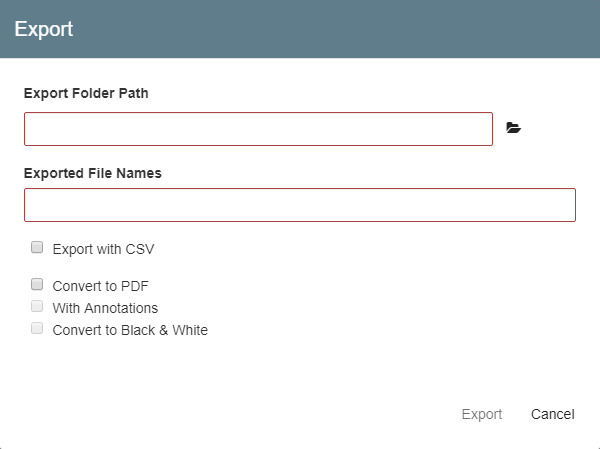
When using Export from the Document Viewer, the document (named "Square9Export") will be downloaded to your computer in it's original format. Additional options are provided when exporting from a Search Result, described below. In the Export dialog that appears when exporting from Search Results, enter or browse to the folder path the document will be exported to in the Export Folder Path text box.
This is the destination folder where files will be saved. The export process will create a folder beneath the specified export folder, named with the Archive name of the selected documents.Tip title Naming Folders for Exports Keep in mind when naming folders that Export will automatically create a folder named for the Archive that the selected documents are in. For example, it would be unnecessary to export documents in an Archive named "Vendor Invoices" to a destination folder named "Vendor Invoices," as this would result in two folders with the same name. A better approach is to create a folder named "Exports" or "Exports_<Today's Date>," and use that as the target folder.
- Use the Browse For Folder interface to create a new folder in your chosen location.
- Use the Browse For Folder interface to create a new folder in your chosen location.
- Specify names for your files in the Exported File Names text box. (For example, filenames might represent the document type or account number for the documents being exported.) If no filename is provided, a randomly generated unique filename will be used. If you choose a naming convention that will create duplicate file names, the files will be made unique with a numeric suffix. Note that you can use S9 Notation to specify Index Field values for your file names. Enter a brace ( { ) and then select from the list of available Fields.
- To convert the original document file format to PDF, enable Convert to PDF. If enabled, you can choose from the following:
- To convert with annotations, enable Annotations. (Note that if you do not have proper permissions, any annotations on the documents will be burned into a PDF at export. This means the users without annotation permissions will always export PDF files.)
- To convert color PDF files to black and white (which tend to make file sizes smaller), enable Convert to Black & White. (Know that annotations can make an otherwise black & white document color. Use of Convert to Black & White is often recommended.)
- To convert with annotations, enable Annotations. (Note that if you do not have proper permissions, any annotations on the documents will be burned into a PDF at export. This means the users without annotation permissions will always export PDF files.)
- Click Export. A pop-up message appears on the bottom-right corner of your desktop.
- When the export is complete, you can click on the message to go to your export location.

...
- To build a CSV data file paired with the document export, in the Export dialog, enable Export with Index Data. New options appear to configure the parameters of your CSV file.
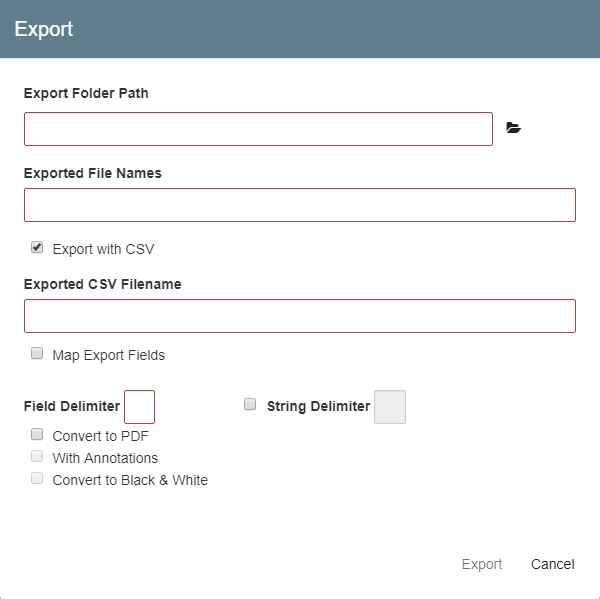
- Enter a name for the CSV file in the Exported CSV Filename text box. You do not need to provide an extension here. If you do, it will be ignored. On export, the file will be placed in the designated export folder path and will be suffixed with an underscore and the selected Archive's name.
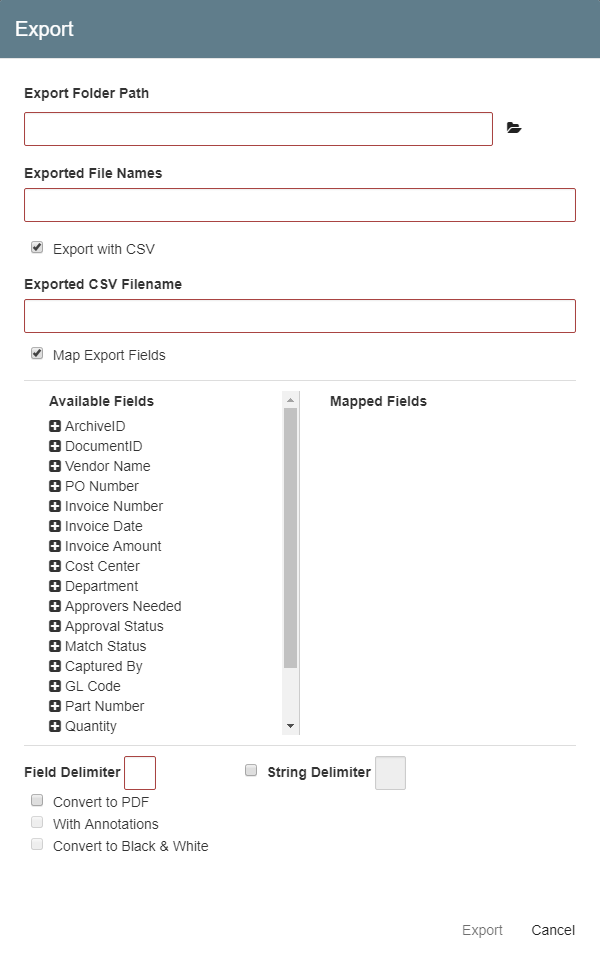
- You can export the data from all available Fields or choose just the ones that you need. To map Index Fields to CSV files, enable Map Export Fields. The full path to the exported file is always included as the last field in the data file.
- Click the Add (+) icon for one or more Fields from the Available Fields list to move them to the Mapped Fields list.
- If needed, use the Delete (-) icon to move them back.
- To change the order of the mapped fields in the CSV file, drag them using the Move (
 double-headed arrow) icon.
 - ArchiveID and DocumentID fields System Fields are available for export. These system fields can be useful when using Bulk Update functions.
- If you wish to generate a file with only paths to exported files, remove all fields from the Mapped Fields panel.
- Click the Add (+) icon for one or more Fields from the Available Fields list to move them to the Mapped Fields list.
- Enter the character to use for field separation within the data file in the Field Delimiter text box. The most common character to use is a comma.
- Optionally, to configure a string delimiter, enable String Delimiter and enter a character in the text box. The default is a double quote mark (").
- Click the Export button to run the export. Note that the Export button will be disabled if you do not provide a Field Delimiter, a CSV Filename, or an Export Folder Path.
...