The Import Scan function requires that GlobalSearch Extensions be installed and configured on a user's desktop, the Scan option has been enabled, and a scanner has been selected for use. With these requisite steps completecompleted, clicking Import Scan will communicate with the selected Twain TWAIN-compliant scanner and initiate a scan process. Note that scanning in this manner does not allow the user you to route documents through a GlobalCapture workflow. This is a direct capture function that sends documents directly to an Archive.
You can scan documents directly from your desktop TWAIN scanning device into GlobalSearch. Select your scanner and the scanner settings provided by the scanner manufacturer from either the GlobalSearch or GlobalCapture User Settings or from the GlobalSearch web client Extensions Manager (see the “Extensions Settings” chapter below for details). Once configured, you can leave these settings until the next time you need to change either your scanner or scanner settings. If you only have one scanner, then you will only need to choose it once. Once you have configured your scanner settings, you can choose to hide the settings while scanning.
To scan directly from a locally attached TWAIN device into an Archive, load the document into your scanner feeder.
In the Archives Pane, select the Archive into which you wish to scan a document and click the Options (three ellipses
 ) button to the right of the Archive's name.
Click Import Click Import Scan and the pages are scanned.

While scanning, a progress window will be displayed.

When the scanner feeder is empty, you see a Continue Scanning messagea Continue Scanning message.
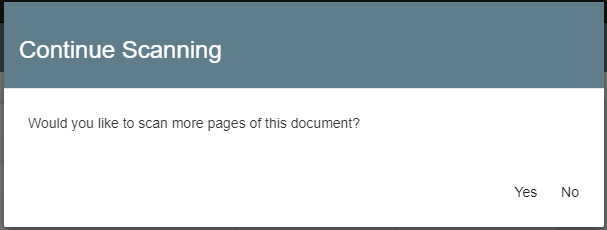
Put more pages into the document feeder and click Yes to click Yes to add more pages to the current document. Click No to Click No to accept the scanned pages as the complete document and move to the next step.
When done scanning, the file it is uploaded and the Index Documents interface the Index Documents interface appears. Enter in Enter the Index Field data for the selected file.
If you are scanning to an Archive immediately after importing, dragging, or scanning to the same Archive, the index data from that previous import, drag, or scan operation appears in the Index Fields.
By default, the document displays, in which case you can use KeyFree to populate Indexing to automatically add indexing data to your Fields.
Clicking Click Hide Document will to close the Document View Area, while still allowing you to index the document and save it. Documents that If documents are not natively supported for viewing will show with , the Document View Area will be hidden by default.
Click Save to Click Save to save the document with any associated index indexing data. The document and data are saved, the indexing interface is closed, and you are returned to the main interface, where you can continue working with documents.
| Tip | ||
|---|---|---|
| ||
Scan at Higher Resolutions. The recommended scanning resolution for OCR is 300 DPI. The clearer the initial image of the text, the better your OCR results will be. However, above about 400 DPI, the benefits in most cases are negligible and create very large files. |
...